In this we will learn to make our own content type and publish it
To look at your Content types in the site browse to site actions > site settings > Content Types
There you will get a list of all content types
Click on create
Type name and desctiption and choose parent type as publishing
and you can choose to add it to new or existing group
I have choosen Name as Hobbies and Parent content type as Publishing Content type
Then you can add some columns from the content type page like i have added a yes no checkbox and a HTML summary page
and a existing columb as job description
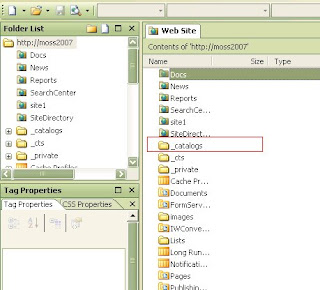
Now open your sharepoint Designer
Open your site from file > open and site name
then open the _catalog folder
![](https://blogger.googleusercontent.com/img/b/R29vZ2xl/AVvXsEjPmrzNxRLpnFCHHcYqNmeJ2RXD8WkfcugYb6NM0vWLmRLz0qgYBQjGtTOBzFDx0Yi6sa7Ias1cGLAC9P1ItJqf-8q8ihCS2JSE0jZBL68hQJeHozJET8mTeM9wtoX0abwZ5LZDAOPrHhjo/s320/catlog+folder.bmp)
![](https://blogger.googleusercontent.com/img/b/R29vZ2xl/AVvXsEiDmnsYdDurK-LUoBQBkEDvnI9OwEbmeQVf2LSPieytaU1Vu_hp56b_YB2Md0JTekE1fuIKsreT8AvJlADEO3We_0o8Y9t7GWAy-dnTpPxn35_8FpifJ9_dqpyzm0ExZ-ZsLaiNG7qByZQ7/s320/masterpage.bmp)
![](https://blogger.googleusercontent.com/img/b/R29vZ2xl/AVvXsEiXV-wGFkjby8oXJ_x3A297HpifRPkjucD0_tI_bsvXNT_4LKE3qMLpvfj1abP6Rgt9UDAdSQsljpc8NYUtJzNNJTeO-0h0095cYeskukdGcTTB8sEQY0fzXAVk-FIGfQXierEqrW4canEL/s320/contentypegroup.bmp)
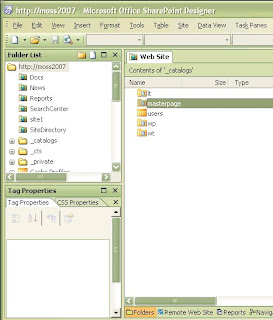
after that go to new and sharepoint content type
![](https://blogger.googleusercontent.com/img/b/R29vZ2xl/AVvXsEhw2tJpKyNvsJ7DxKDOMTI35OmDEmcMMIKtn00MgATiqRHy1taYtUh7s_YpmoTmYkGWjECzeCLZkZwhjbTP0m9LQw_5PdHNtdOCSkpDtlmqNB8mdDItzf5vp2BJA4SkjYpyaQ0eMShVzqUi/s320/newspcontent.bmp)
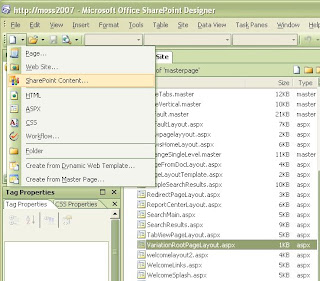
after it is listed in the list of content types, double click the content type and open it in design mode
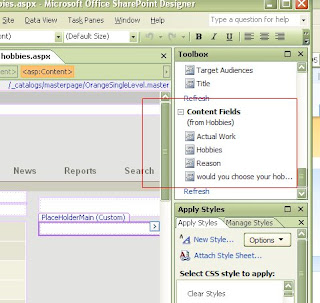
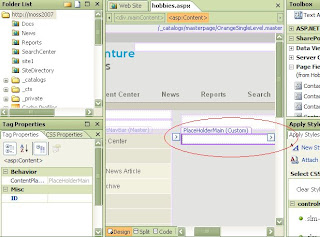
![](https://blogger.googleusercontent.com/img/b/R29vZ2xl/AVvXsEg5DshqSWs9pAHrwA8OmuvCcTUknTuV-KVMo6iRqKiOtiIyChp50tSgmTqTY9lfjn8zdLsG9EV1UzSMfdh842zGBG2vvRfx5lU96ANJBSEwihkplka2Y-w80gounxab6QaRSckyODA_C10r/s320/placeholdermain.bmp)
Go to the tool box situated at the right upper of the page and drap drop the columbs
![](https://blogger.googleusercontent.com/img/b/R29vZ2xl/AVvXsEgVN4ZXHB2RpCYutuYI1RxM6V1pSRkvT27trDAmrkwsMgPn7XOjgu2QUum3gxd5fzhZjGfR5QzLBz-N_yqPH67cmqD4GbfP9S8d8L7B3hT34aPV5UHMCTz2Kf_yh5xurqAVKTTXghFreP86/s320/toolbox.bmp)
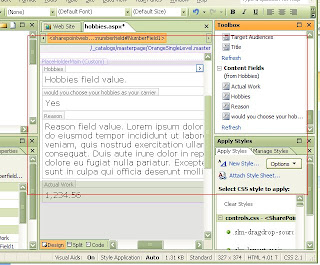
then you will see something like this
![](https://blogger.googleusercontent.com/img/b/R29vZ2xl/AVvXsEjrPlpAIqTgf8SIX3EcXThm87qqbSHmmimAh9JvhzxMjpPAz6bsbFW3dbl2ncVk17MKlPdURfG4Knd9H7EIsKpigTZyHGx25fx5hvbuyz46iVk2mKNCdombu6IInJkHAgAH53NERfJuczTT/s320/dragdrop.bmp)
Wanna check that out ok,
Go to the main page of your site
site actions > site settings and Create Page
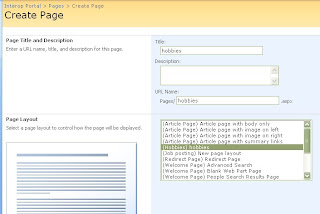
![](https://blogger.googleusercontent.com/img/b/R29vZ2xl/AVvXsEgSBkT2OjqRjImvH5vZqmFeWWPE0ou4fm0avDHbeJz55lXtqE2aGSg-CN6MoEHA1pvj8xPa2XGXayQnRysn-CePrJS1LvhlTBR3ssj77vUqpCL-cuwtooPzCRDXxVQgCLGAicwYndN4jlif/s320/create+page.bmp)
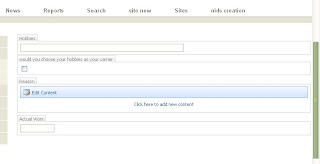
create a page using it and tadaaaaaaaaaa here is your own page
![](https://blogger.googleusercontent.com/img/b/R29vZ2xl/AVvXsEhwNXy7sE0m4WDTGTK1Uxcp-NVX96CTr_3izyhgKEvptnnYKXmfFTp1iixeBh5Yuo7-pNspX8TJUyoGLC16moRWXjb-MbgB5GLckcZvZuLyLoO9Ovv300u4rSX45ZgihFikQX9zaUx0RfsO/s320/page.bmp)
1 comment:
hey
Post a Comment