Tuesday, December 30, 2008

Sharepoint Hidden themes.

  • Sharepoint Hidden themes.

    I am from the Admin background of Sharepoint but I will always love to design my Sharepoint site and there is a big world out there, I mean just open up your browser go to Google or Live and just type "customizing Sharepoint sites". Bang !!! there you go. and there are millions of articles, blogs, TechNet , KB's, Designer videos and lot of them. but as you I am very confused where to start with. I got a link where it talks about creating your own theme which will be available through Site actions > Site settings > Site theme.
    how cool is that, something that's your theme your choice of color and images and available so easily that you can apply it to any site you want, well I will talk about this on my next post because that's still in the pipeline.
    ok now, while trying to create my own theme I noticed something for that you will first have to go through the article http://sharepoint.microsoft.com/blogs/GetThePoint/Lists/Posts/Post.aspx?ID=122 which talks about making your own custom theme, so all the themes are located in the folder C:\Program Files\Common Files\Microsoft Shared\web server extensions\12\TEMPLATE\THEMES and the list is available at the Sharepoint site
    so whenever you have to change the theme of your Sharepoint site simply log into the Sharepoint site go to Site actions > Site settings > Site theme select a theme and change it
    let us list the available themes (shown on the page)
    1. Belltown
    2. Breeze
    3. Cardinal
    4. Citrus
    5. Classic
    6. Default theme
    7. Granite
    8. Jet
    9. Lacquer
    10. Lichen
    11. Obsidian
    12. Petal
    13. Plastic
    14. Reflector
    15. Simple
    16. Verdant
    17. Vintage
    18. Wheat

    that means total 18 themes that you can play with but if you check on the folder C:\Program Files\Common Files\Microsoft Shared\web server extensions\12\TEMPLATE\THEMES. there are some additional folders that you can spot such as
    1. Centrlad
    2. Club
    3. Fresh
    4. Sharedservice
    5. Spsky

    that means we can actually play with 23 themes but these 5 are hidden and hence cannot be applied to the site from GUI, however if you make a little change in a file you can get these themes as well
    ok now, follow the steps to get the hidden themes


    Go to the XML file located at C:\Program Files\Common Files\Microsoft Shared\web server extensions\12\TEMPLATE\LAYOUTS\1033
    · Locate SPTHEMES.XML
    · Open it in a notepad
    · add the following code


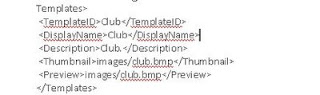
( here we are trying to apply the Club theme)

Now open the Sharepoint site and go to site actions > site settings > site theme, amongst other entries you can spot Club as a theme, click on that it will show a broken image as preview; we will fix that in a minute
click apply Tadaaaa.....

you can see a new theme applied to your site, i would suggest you to try the Spsky theme as its beautiful with color combination of sea blue and green colors

Now fixing the broken image preview, as soon as you apply the theme take a screenshot of that theme and edit it in paint making the size smaller you can add the image to C:\Program Files\Common Files\Microsoft Shared\web server extensions\12\TEMPLATE\IMAGES and name it Club.bmp or whatever theme you choose
and you are done.
now you can play with the themes that are new and fresh :)

Tuesday, November 18, 2008

Installing Sharepoint on Server 2008

So all of us waited to see and know how working with Windows Server 2008 would be, So did I, I wanted to install Sharepoint 2007 (MOSS) on Windows Server 2008, and use the client as vista, Thought that the task might be quite simple, to its time to get working !!!

> My first Step : Installing Windows Server 2008

To be really honest I used a vhd that had the pre-installed software, but I would really like to explore that too.

the first thing I notice that Server 2008 has the interface totally different to 2003, it had the vista look which was quite pleasing to the eye also that there were different names for the similar things like suppose you have to configure the TCP/IP settings, I had to wander around the whole server to get it right. you can locate it at Control panel > Network and Internet > Network connections and configure the IP

> My second Step : Installing IIS 7.0

To install Share point my first step was to install IIS (which was a very, very painful task, trust me) well it is located at the Administrative Tools > Server Manger > Then you choose the IIS service and proceed with the installation. This was simple!!!

> My third Step : Installing .net framework 3.0

In server 2003 days you had to download the software from the site, here .net framework 3.0 is bundled with the server 2008, you will have to pull it from the Administrative Tools > Server manager > Features > add features > Check on .net framework 3.0 services, and you're done.
Positive point as the software is included with the OS it works for you even if you don't have an internet connection

> Fourth Step : Installing MOSS

Ok now its SHOWTIME, one thing that you must note before you install MOSS RTM on Server 2008 is that Server does not proceed with the installation unless you have the slipstream version of Sharepoint (Incase you are wondering what that is all about, it means MOSS + Service pack 1), to make your RTM CD a slipstream simply download the SP1 for MOSS setup file and place it on you upgrade folder (for MOSS), then proceed,

For this you will have to copy the entire CD on your Local disk, then add the KB on the upgrade Folder then hit the setup file. Here I am performing the Basic install of the product that it with SSEE.

One little thing that frustrated me was that after placing the WSS SP1 and MOSS SP1 on the upgrade folder the installation did not proceed to resolve this you will have to extract the KB articles on the upgrade folder via command line which will be something like 'c:\wssv3sp1-kb936988-x86-fullfile-en-us.exe /extract:c:\wsssp1'
After the struggle I was finally able to install MOSS on Server 2008, so In the end success matters, I would love to experiment more on the new IIS version "version 7.0", and Sharepoint site, keep an eye on my future posts.

Thursday, November 13, 2008

Installation of O.S. Windows Server 2003 R2:-

Installation Process Types:-
1. BASIC
2. RIS (Remote Installation Services)
3. NETWORK

BASIC:-
Normal Installation Type, through Product Installation CD.

The Normal install consists of two types Attended and Unattended install.

Attended install is where you sit in front of the machines and install the whole operating system , this process may not be feasible if you are working with more than one machine, suppose you want to install OS on 15 machines you will be using the method called Unattended install where you will be creating an answer file, for the setup

• The answer file will be provided by the floppy drive, so the OS Compact Disk works on the Data provided by it

• To create answer file copy the file at drive \setup\support\tools\Deploy.cab\setup.manager.exe

• Copy it to another location on network then run the wizard and add the information like the CD key, regional settings, machine names to be given, organization name etc. then save it, the file will be saved anywhere like C:\setup\unattended.

• This will create 3 files
Unattended.bat
Unattended.txt
Unattended.udc

• Now to make sure the process runs successfully you will have to perform some changes as
Rename Unattended.bat to “winnt.bat”
Rename Unattended.txt to “winnt.sif”

• Now this will only work if you have the Boot priorities set to
I – CD ROM
II – Floppy Drive
III – HDD

RIS (Remote Installation Services)

RIS supports two types of operating system images:
 CD-based images (images created by using RISetup)
 Remote Installation Preparation (RIPrep) images.

The CD-based option is similar to setting up a server operating system directly from the Windows Server 2003 product CD, except that the source files reside on a RIS server.
You can create a RIPrep image from a server that is running Windows Server 2003 with SP2, and you can then deploy this image to other similar servers that are connected to the network.

Creating a CD-based (RIS setup) image to add to a RIS server
After you install RIS, perform the following steps to create the image and then add the image to your RIS server.

To create an image of Windows Server 2003 with SP2 and add it to your RIS server
1. Create an integrated version of the operating system with SP2.
2. To create an image, click Start, click Run, and then type: risetup.exe /add
3. The Remote Installation Services Setup Wizard appears. Follow the instructions in the wizard. When the Installation Source Files Location page prompts you for the image source, enter the path to the shared folder that contains the integrated version that you created in Step 1.
4. A box appears showing the progress of the installation. After the RISetup image is complete, you can install the image on each server as described in Remote Installation Services on the Microsoft TechCenter Web site.

Creating a Remote Installation Preparation (RIPrep) image to deploy to other servers

If you want to add additional programs or settings to your integrated installation image, you must have a CD–based image of Windows Server 2003 with SP2 on your RIS server. Note that you cannot use the /integrate option to integrate SP2 directly into an existing CD-based image or a RIPrep image.

To update existing RIPrep images
1. Use RIS to install the RISetup image on your computer.
2. Add the additional programs and settings that you want to include in the image.
3. Run RIPrep to create an image on the RIS server. For instructions on how to run RIPrep on RIS servers running Windows Server 2003, see:
• Remote Installation Services (http://go.microsoft.com/fwlink/?LinkId=36940 )

• Automating and Customizing Installations (http://go.microsoft.com/fwlink/?LinkId=44324 )

4. You can now deploy your RIPrep image to other servers.

NETWORK:-

Installing SP2 using source files that are located on a network share
To install SP2 from the network, first extract the installation files to a shared distribution folder. Then install SP2 on each computer using these files.
To install the service pack using a network share

1 Connect to the network or computer where you want to create the distribution folder.

2 In the shared folder, create a distribution folder.
For example, to create a distribution folder named WS2003SP2, type mkdir Drive:\WS2003SP2 at the command prompt (Drive: represents the drive where you want to store the distribution folder).

3 To extract the files to the distribution folder, type the following at the command prompt, where Path is the location of the distribution folder:
WindowsServer2003-KB914961-SP2-XXX-LLL.exe /X:Path

4 For each computer that you plan to update, back up the files and close programs before you continue (unless you plan to force programs to close during the installation).

5 To install the service pack from the shared distribution folder, run Update.exe. For example, to install from a distribution folder named WS2003SP2, type the following at the command prompt using the desired command-line options :
Drive:\WS2003SP2\i386\Update\Update.exe

6 Follow the instructions in the Setup Wizard.

7 After Update.exe has completed, restart the computer to complete the installation. SP2 will not be fully installed until you restart your computer.

8 If you disabled your antivirus software, enable it after you restart the computer.

THE NETWORKING CLASS

1. TCP / IP is a suit of the protocols, TCP works on port 6

2. You can communicate to another machine by PING-ing to it using its IP address

3. The full form of PING is Packet Inter Net Groper,
The PING command can be defined as a computer network tool used to test whether a particular host is reachable across an IP network; it is also used to self test the network interface card of the computer, or as a speed test.

4. You can also use the command called Address Resolution Protocol to determine the who and what of your machine, i.e you can get a list of all the machines that spoke to your machine by typing the command arp –a
Address Resolution Protocol (ARP) is the method for finding a host's hardware address when only its Network Layer address is known.
As soon as you fire this command it gets a list of all the machines talking to your machines
Arp works in two formats arp request and arp acknowledgement. Both request and acknowledgement makes a reply

5. IP addresses : An Internet Protocol (IP) address is a numerical identification (logical address) that is assigned to devices participating in a computer network

There are 5 classes of this address

CLASS A 1-126
CLASS B 128-191
CLASS C 192-223
CLASS D 229-239
CLASS E 240-256

127 is reserved for Loop back, checks the position of NIC and NOS – Network Operating System

6. Subnet mask- it is actually the number of bit that can be used by the machine,

For example: 192.168.10.1/ 24
8.8.8.0 Bits
Equals 255x255x255x0

172.16.0.0
8.8.0.0
Equals 255x255x0x0 = 165025 bits

255 x 255 x 255 = 16521375
7. Private IP : The Internet Assigned Numbers Authority (IANA) has reserved the following three blocks of the IP address space for private internets (local networks):

10.0.0.0 - 10.255.255.255
172.16.0.0 - 172.31.255.255
192.168.0.0 - 192.168.255.255

These IP’s must not be used in Internet
In a IP address first 24 Bits is the Company ID and last 25 bits is Unique ID

8. Difference Between HUB and Switches :

HUB :
Hub is a common connecting device that connects the machines in network or LAN. Hub has a tendency to broadcast the data every time so if it needs to send data to Mac1 to will broadcast to all the machines in network, Hackers can make god use of it so its Insecure and because of the broadcasting technique its slower..

SWITCHES: :

This is again a device that connects Computer devices however it broadcasts the information only once, and then it creates the IP – MAC table and remembers the IP address of the machines to deliver the data correctly next time, also its quite evident that this method is more secure & Faster


9. LAN :

Local area network (LAN) supplies networking capability to a group of computers in close proximity to each other such as in an office building, a school, or a home. A LAN is useful for sharing resources like files, printers, games or other applications. A LAN in turn often connects to other LANs, and to the Internet or other WAN.

LAN works on two things basically, Physical MAC and Logical IP


10. Network Topology :

Four types of network topology
a. Bus : Linear setup
b. Star : One central switch or Hub connection to computers
c. Ring : each packet is send round ring until it reaches destination
d. Mesh : All the machines are connected to one another
I got the best explanation on the site http://www.firewall.cx/topologies.php


11. Difference Between FAT and NTFS
Refer to my post on link http://alliknw.blogspot.com/2008/05/diffrence-between-ntfs-and-fat-file.html


12. Operating system and versions :
NT 4.0 works on FAT 16
NT 5.2 is renamed as server 2003


• Windows server Web edition Does not support ADS
• Active Directory cannot be installed on FAT

Thursday, November 6, 2008

Search server 2008 Express edition gives Error message as “Your License for Microsoft search server has expired”

Troubleshooting Search server 2008:

Search server 2008 Express edition gives Error message as “Your License for Microsoft search server has expired”

Search server 2008 can also be used at your Organization even if you are not using Sharepoint at all, in this scenario you can crawl your File share, Search server 2008 indexes the files then you can use the search center to insert the key words.
Now if you are using the Search server 2008 express edition and you face a problem while search as an error message as “Your License for Microsoft search server has expired”

You will have to check the following
 Check if the Help search that us Windows Sharepoint Help search service and Office Sharepoint search is running with same account
 Check the content access account
 Check if the help search is working
 Incase its not or the accounts configured for both the services is different Stop and start the services using Services on server link under operations tab
 Then you are sure that the new databases are at work
 Then you will have to migrate to Add remove programs and locate the Search server Express and run a repair
 Then reboot the machine
 Then run the PS config wizard again
 Let it finish
 Launch the Search dashboard
 The search will not show any license errors now. 

Saturday, October 25, 2008

Excel web access web part gives error message as “Access Denied”

Excel web access web part gives error message as “Access Denied”

Now suppose you wish to look at your workbook in sharepoint site you will have to take care of some things, first and the foremost is that your Excel calculation services needs to be turned on,
>>Then you need to make sure that the excel file you save is in xlsx format as the excel calculation services is not compatible with xls files.
>> Then make sure the location which can be UNC path or a sharepoint site is added to the trusted file location in SSP
>> Also choose Trusted children and Trusted data connection in Libraries and Embedded
>> Enabled user defined functionalities allowed

Then you add the Excel web Access web part to the site. Try adding the path in the configurable section, try accessing the page if you still get Access Denied Error message then maybe the culprit is your authentication provider which might be Kerberos, so you will have to run these 3 commands to make sure it is activated

stsadm -o set-ecssecurity -accessmodel delegation -ssp SharedServices1 (here escsecurity means excel calculation security)

stsadm -o setsharedwebserviceauthn -negotiate

stsadm -o execadmsvcjobs

Ran an IIS Reset

Then try accessing the webpart the workbook will render just fine.

Thursday, October 16, 2008

List of all stsadm commands with attributes

here is a list of all possible stsadm commands used in sharepoint site, this list was passed to me by a friend, thanks amzi
====================================================================

1. stsadm -o activatefeature {-filename -name -id } [-url ] [-force]
2. stsadm -o activateformtemplate -url [-formid -filename ]
3. stsadm -o addalternatedomain -url -incomingurl -urlzone -resourcename
4. stsadm -o addcontentdb -url -databasename [-databaseserver ] [-databaseuser ] [-databasepassword ] [-sitewarning ] [-sitemax ]
5. stsadm -o adddataconnectionfile -filename [-webaccessible ] [-overwrite ] [-category ]
6. stsadm -o add-ecsfiletrustedlocation -Ssp -Location -LocationType SharePointUncHttp -IncludeChildren TrueFalse [-SessionTimeout