Wednesday, May 21, 2008

Branding sharepoint site III

Making your own content type
In this we will learn to make our own content type and publish it

To look at your Content types in the site browse to site actions > site settings > Content Types

There you will get a list of all content types

Click on create

Type name and desctiption and choose parent type as publishing

and you can choose to add it to new or existing group

I have choosen Name as Hobbies and Parent content type as Publishing Content type

Then you can add some columns from the content type page like i have added a yes no checkbox and a HTML summary page

and a existing columb as job description


Now open your sharepoint Designer

Open your site from file > open and site name

then open the _catalog folder
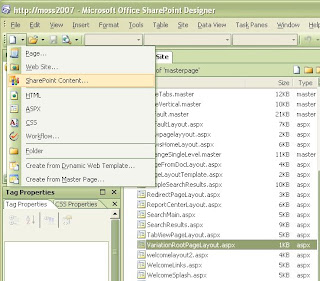
Then open folder master page and click on page layout


after that go to new and sharepoint content type

after it is listed in the list of content types, double click the content type and open it in design mode
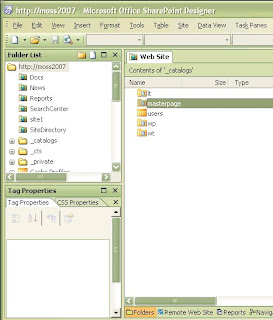
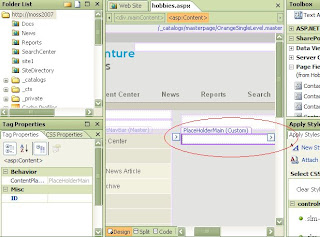
There you will see the place holder part

Go to the tool box situated at the right upper of the page and drap drop the columbs


then you will see something like this

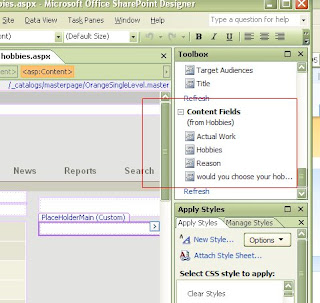
Save this page check in the ocument and you are done, you have sucessfully made your own content type,

Wanna check that out ok,

Go to the main page of your site


site actions > site settings and Create Page
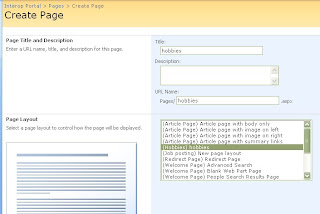
You see your creation listed there

create a page using it and tadaaaaaaaaaa here is your own page

Tuesday, May 20, 2008

Branding sharepoint site Part II

How many times have I wondered when I see 'Internal & Restricted' written on every page or site or Copyright Label on Bottom of sharepoint sites being stamped on everypage that we browse. well that is actully the fundas of WCM . I will post a topic on Content Management and intergration of CMS 2002 intergration with MOSS in my later Posts
back to where I was I experimented on how and where to add the Copyrigth label and implement it on all other sites and yepheeee it worked for me with some limitaions which i will list down.

To start of with we need to know what a master page is all about in sharepoint and where do you find it A master page determines the loook and feel of your site and it also determines the navigation controls that useres use. Now suppose you have a blsnk site collection and your want to change the master page of the site go to Site actions > site settings > click on Master Page under look and feel
There the option will be default change it to anyone you like I will take example of Blue Band master page

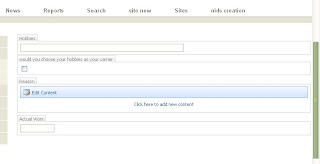
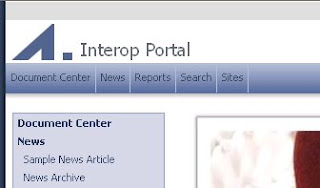
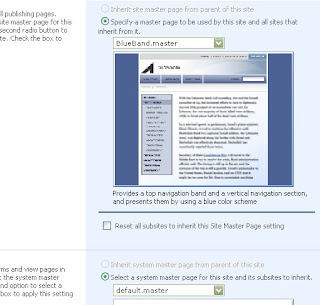
Select the page and check on check box that says inheriting to subsites. Now your page is changed to a brand new master page
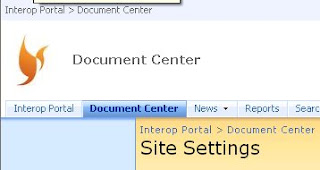
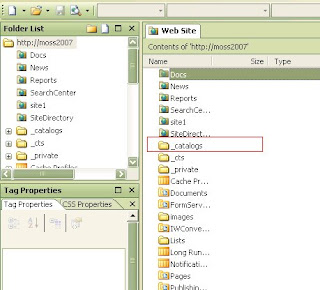
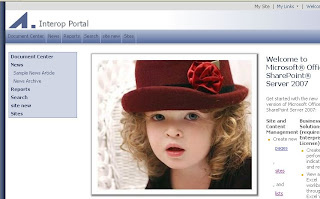
Now after this you have to open this site in sharepoint designer Then Open the Site in Designer and open folder called _catalogs folder and double click the Master page folder.

There Double click on the Blue Band master folder. And open the folder now all you have to do is add this chunk of code

So it starts showing on the page but how do we implement it on all the pages

After this is done we will switch to Apply styles on the bottom right corner and select topNavitem so that this implies to all the pages where topNavItem is used and here is how it looks

Limitations are that I didnot find it being implemented on the new page that i created even after changing it to master page

Also it was comimg haywire on some pages and i had to adjust the table. Please do leave me comments and let me know if there is anything that I need to add here


Branding the sharepoint site Part I

Alright, I have come across a very new and good feature of MOSS, Its called Branding the site now what do you actually mean by branding the site its to have a label or logo of the company other that using Microsoft Features, also to set up a theme that complies to your product like L'oreal and other companies who will alwayz use there own specific logo.
Now Changing the logo of the site is fairly simple you just need to upload the image to any document library and copy the link
like the default logo of the site is :


Then you upload a new Image file to the Document Library, click on it and take the full url and browse to Site Actions > Site settings > Title Description Icon and settings and Specify the url at the Logo url and Description icon, Click on OK and your done the site starts showing your logo


Tadaaaaaaa it changes every where in site but remember it will not apply across web applications and will not be inherited to new subsites that you create you will have to perform the same operation again

Thursday, May 15, 2008

Central Administration Backup

Throughout my practical experiences I have alwayz observed that backup and restore from Central Admin fails 9 times out of 10, however if we observe SharePoint backup and restore is the most powerful procedure incase you have landed into such situation that you have absolutely nothing left in your sharepoint site when you have to recover from an absolute disaster.

What is the difference between the Central admin back up and the SQL back up ?

That’s a great question to answer, although the SQL backup and restore procedure is fast and simple, it works on the database part and just attaching those databases gets the site back to normal conditions but the Central administration backup also known as the Catastrophic backup and restore method gives you an option to backup your entire farm which includes the Configuration databases, SSP databases search databases and also the content databases, that means if you take a Catastrophic backup and save it to a secure place you can get the entire site back within less time and even you will not need to index new documents to make search work, isn’t that perfect !!

But you will have to take care once you take a full catastrophic backup, keep taking incremental backups and number them properly then while restoring you will have to restore the full backup first and the incremental backups one by one.

My advice to you is whenever you take a catastrophic backup make sure you test it before you relay totally on it, there is a command line mode that will also help you take the same type of results.

Here is a little advice from Mr. Tech net on how do you do it Backup and Restore
Now there is a great explanation of the attributes given here. Which can be used while you execute the command

Restoring Single Site in Sharepoint

Taking Backup & Restore of Sharepoint with stsadm mode : (Command line Mode )

There are some advantages of command line backup and restore they are:
It is a fast and "full-fidelity" procedure; that is, it will exactly restore the sites you backed up, including security settings and personal site views. This tool has some limitations and behaviors you must be aware of, such as:
1> It can back up and restore a complete farm, a single site collection, or a single site.
2> The result will be stored as a file. STSADM cannot write to other backup media.
3> It must be executed on the SharePoint server.
4> You must be a SharePoint server administrator to run STSADM.
5> This is a command-line tool. There is no graphical user interface included for this tool.

Taking a stsadm -o backup :

Open the folder C:\Program Files\Common Files\Microsoft Shared\web server extensions\12\BIN in command prompt
Type command stsadm –o backup –url -filename
After the process is complete you will see backup.bak file located in c:\

Taking a stsadm -o export :

Open the folder C:\Program Files\Common Files\Microsoft Shared\web server extensions\12\BIN in command prompt

Type command stsadm –o export –url -filename

After the process is complete you will see backup.cmp file located in c:\

Features :
It can back up and restore single sites.

It can back up any site including its sub sites.

It does not have to be the top-level site in the site collection.

It can restore the site permissions The result will be stored as a file.

It must be executed on a SharePoint server with a Central Administration tool installed.

You must be the site administrator to run this command.

This is a command line tool. You can schedule it using Windows Tasks.

===============================================================

The main diffrence between Export and Backup is that export can be used to take a backup of single site collection

The backup taken via command line commpresses dats so if you compare the file size from SQL this will always be reduced

You can perform operations like taking a backup of a subsite from one web application and restoring it to top level sitye collection on another web application with his mode of backup

Restore Commands :

Open the folder C:\Program Files\Common Files\Microsoft Shared\web server extensions\12\BIN in command prompt

Type command stsadm –o restore –url -filename

for export type of backup use restore command as

stsadm -o import -url -filename

Restoring single Item in Sharepoint

We all know how important backup is incase of a catestropic situation or a disaster, you need to make sure that you have regular backups of your sharepoint site so that you can recover everything even if you lost everything, backups are also used in daily and diffrencial forms so that you can recover data loss.
Now the major diffrence between Full and Diffrencial back is that Full backup contains all your files and folders and full history information of your data and Diffrencial backup starts from the end of full backup, i.e if you have taken a full backup of your database till tuesday and then you will take a diffrencial backup on wednesday it will not cover everything again it will only cover the diffrences from tuesday to wednesday
Now there are many ways to take a backup of Sharepoint site
Lets start for backup of Files & Folders

Recycle Bin :
Sharepoint 2003 and MOSS 2007 has a unique two stage recycle bin. It is used to restore single documents or folders those are deleted from site also cover announcements and pictures from libraries. If you delete a document from library it lands in recycle bin and stays there for 30 days or unless you delete it from recycle bin too.
Now why is it called a two stage recycle bin because If a user 'Nidhi G' has contributer permission the sharepoint site and if the user deletes a document from library which lands in Recycle Bin
and she empties the recycle bin too, then that document is lost from the profile of the user but it will be avaliable in the administrators bin until he deletes it from there
And only administrator can restore it. The settings for Recycle bin are in Central Administration page > Application Management > Web application Genral Settings
There you can perform settings on recycle bin

Monday, May 12, 2008

Installing Exchange Server 2003

Exchange Server 2003 Standard Edition:
Exchange 2003 Standard Edition is designed to meet the messaging and collaboration requirements of small and medium corporations and for specific messaging server roles or branch offices.
• One storage group can be created on a server
• One mailbox store database and one public folder store database that can be accessed by using MAPI and Outlook Web Access
• Up to four more public folder store databases that are accessible only programmatically
• Maximum 16-gigabyte (GB) database limit per database (75 GB with Microsoft Exchange Server 2003 Service Pack 2)
• Exchange clustering is not supported
• X.400 connector is not included


2. Exchange Server 2003 Enterprise Edition:
Exchange 2003 Enterprise Edition is designed for large enterprise corporations. With Exchange 2003 Enterprise Edition, you can create multiple storage groups and multiple databases. Exchange 2003 Enterprise Edition provides an unlimited message store that removes the constraints on how much data a single server can manage.
• Four storage groups
• Five databases per storage group
• 16 terabyte database limit, limited only by hardware
• Exchange clustering is supported
• X.400 connector is included


Check Services before installing the Exchange Server 2003

ADS
DNS
ASP.NET
Internet Information Services (IIS)
World Wide Web Publishing Service
Simple Mail Transfer Protocol (SMTP) service
Network News Transfer Protocol (NNTP) service


Installing Exchange Server 2003:


To install the first Exchange 2003 server in the forest, you must use an account that has Exchange Full Administrator permissions at the organization level and is a local administrator on the computer. Specifically, you can use the account you designated while running ForestPrep or an account from the group that you designated.


To run Exchange 2003 ForestPrep


1. Insert the Exchange CD into your CD-ROM drive.
2. On the Start menu, click Run, and then type E:\setup\i386\setup /ForestPrep, where E is your CD- ROM drive.
3. On the Welcome to the Microsoft Exchange Installation Wizard page, click Next.
4. On the License Agreement page, read the agreement. If you accept the terms, click I agree, and then click Next.
5. On the Product Identification page, type your 25-digit product key, and then click Next.
6. On the Component Selection page, ensure that Action is set to ForestPrep. If not, click the drop-down arrow, and then click ForestPrep. Click Next.

7. Click Next to start ForestPrep. After ForestPrep starts, you cannot cancel the process.
8. On the Completing the Microsoft Exchange Wizard page, click Finish.

To run Exchange 2003 DomainPrep


1. Insert the Exchange CD into your CD-ROM drive. You can run DomainPrep on any computer in the domain.
2. From a command prompt, type E:\setup\i386\setup /DomainPrep, where E is your CD-ROM drive.
3. On the Welcome to the Microsoft Exchange Installation Wizard page, click Next.
4. On the License Agreement page, read the agreement. If you agree to the terms, click I agree, and then click Next.
5. If the Product Identification page appears, type your 25-digit product key, and then click Next.
6. On the Component Selection page, ensure that Action is set to DomainPrep. If not, click the drop-down arrow, and then click DomainPrep. Click Next.
The DomainPrep option on the Component Selection page

7. On the Completing the Microsoft Exchange Wizard page, click Finish.

Now would be the time to run Exchange 2003's setup :

1. Log on to the server on which you want to install Exchange. Insert the Exchange Server 2003 CD into your CD-ROM drive.
2. On the Start menu, click Run and then type E:\setup\i386\setup, where E is your CD-ROM drive.
3. On the Welcome to the Microsoft Exchange Installation Wizard page, click Next.
4. On the License Agreement page, read the agreement. If you agree to the terms, click I agree, and then click Next.
5. On the Product Identification page, type your 25-digit product key, and then click Next.
6. On the Component Selection page, in the Action column, use the drop-down arrows to specify the appropriate action for each component, and then click Next.

7. On the Installation Type page, click Create a new Exchange Organization, and then click Next.

8. On the Organization Name page, in the Organization Name box, type your new Exchange organization name, and then click Next.

9. On the License Agreement page, read the agreement. If you agree to the terms, click I agree that I have read and will be bound by the license agreements for this product, and then click Next.
10. On the Component Selection page, in the Action column, use the drop-down arrows to specify the appropriate action for each component, and then click Next.
11. On the Installation Summary page, confirm that your Exchange installation choices are correct, and then click Next.
12. On the Completing the Microsoft Exchange Wizard page, click Finish

Troubleshooting Installation of Exchange Server 2003
Made sure you have enough Disk Space
Check the Edition of Exchange Server (Enterprise is best)
Check Active Directory, a user's property sheet is a good place to start.
Check DNS.
LDAP port 389 in use, so cannot connect to Exchange 5.5. Solution change and synchronies port numbers.
If installation fails make sure you delete EXCHSRV\mbdata before trying again.
Why does no-one ever check the Event Viewer? If there is a problem you will see a red error dot in the logs. Remember to check the Application log as well as the System log. If the messages are not self explanatory, look up the error number in TechNet.
Check that ALL the IIS components are installed including SMTP and NNTP. Make sure that ASP.NET and .NET Framework are also installed. Run DCDiag or NetDiag for extra clues as to what is wrong with the

Installing Types of Windows Server 2003

1. BASIC
2. RIS (Remote Installation Services)
3. NETWORK

Basic installation is through a CD key and Options that we choose
Remote Installation Services:
RIS supports two types of operating system images:
§ CD-based images (images created by using RISetup)
§ Remote Installation Preparation (RIPrep) images.

The CD-based option is similar to setting up a server operating system directly from the Windows Server 2003 product CD, except that the source files reside on a RIS server.
You can create a RIPrep image from a server that is running Windows Server 2003 with SP2, and you can then deploy this image to other similar servers that are connected to the network.
Creating a CD-based (RIS setup) image to add to a RIS server
After you install RIS, perform the following steps to create the image and then add the image to your RIS server.
To create an image of Windows Server 2003 with SP2 and add it to your RIS server
1. Create an integrated version of the operating system with SP2.
2. To create an image, click Start, click Run, and then type: risetup.exe /add
3. The Remote Installation Services Setup Wizard appears. Follow the instructions in the wizard. When the Installation Source Files Location page prompts you for the image source, enter the path to the shared folder that contains the integrated version that you created in Step 1.
4. A box appears showing the progress of the installation. After the RISetup image is complete, you can install the image on each server as described in Remote Installation Services on the Microsoft TechCenter Web site.

Creating a CD-based (RIS setup) image to add to a RIS server
After you install RIS, perform the following steps to create the image and then add the image to your RIS server.
To create an image of Windows Server 2003 with SP2 and add it to your RIS server
1. Create an integrated version of the operating system with SP2.
2. To create an image, click Start, click Run, and then type:
risetup.exe /add
3. The Remote Installation Services Setup Wizard appears. Follow the instructions in the wizard. When the Installation Source Files Location page prompts you for the image source, enter the path to the shared folder that contains the integrated version that you created in Step 1.
4. A box appears showing the progress of the installation. After the RISetup image is complete, you can install the image on each server as described in Remote Installation Services on the Microsoft TechCenter Web site.

Creating a Remote Installation Preparation (RIPrep) image to deploy to other servers
If you want to add additional programs or settings to your integrated installation image, you must have a CD–based image of Windows Server 2003 with SP2 on your RIS server. Note that you cannot use the /integrate option to integrate SP2 directly into an existing CD-based image or a RIPrep image.
To update existing RIPrep images
1. Use RIS to install the RISetup image on your computer.
2. Add the additional programs and settings that you want to include in the image.
3. Run RIPrep to create an image on the RIS server. For instructions on how to run RIPrep on RIS servers running Windows Server 2003, see:
•Remote Installation Services (http://go.microsoft.com/fwlink/?LinkId=36940 )
•Automating and Customizing Installations (http://go.microsoft.com/fwlink/?LinkId=44324 )
4. You can now deploy your RIPrep image to other servers.

NETWORK:-

Installing SP2 using source files that are located on a network share
To install SP2 from the network, first extract the installation files to a shared distribution folder. Then install SP2 on each computer using these files.
To install the service pack using a network share
1 Connect to the network or computer where you want to create the distribution folder.
2 In the shared folder, create a distribution folder.
For example, to create a distribution folder named WS2003SP2, type mkdir Drive:\WS2003SP2 at the command prompt (Drive: represents the drive where you want to store the distribution folder).
3 To extract the files to the distribution folder, type the following at the command prompt, where Path is the location of the distribution folder:
WindowsServer2003-KB914961-SP2-XXX-LLL.exe /X:Path
4 For each computer that you plan to update, back up the files and close programs before you continue (unless you plan to force programs to close during the installation).
5 To install the service pack from the shared distribution folder, run Update.exe. For example, to install from a distribution folder named WS2003SP2, type the following at the command prompt using the desired command-line options :
Drive:\WS2003SP2\i386\Update\Update.exe
6. Follow the instructions in the Setup Wizard.
7. After Update.exe has completed, restart the computer to complete the installation. SP2 will not be fully installed until you restart your computer.
8. If you disabled your antivirus software, enable it after you restart the computer.

Diffrence Between Windows Server 2000 and Windows 2003 server with advantages


Windows Server 2000:

  • 32 bit processer
  • Inbuild IIS 5.0
  • Does not support shadow coping
  • Doesnot Support clustering
  • Cannot change the DNS Name

Windows Server 2003:

  • 32 & 64 bit processer
  • Inbuild IIS 6.0
  • Support shadow coping
  • Support Clustering
  • Able to Change the DNS Name


Backup Windows 2003 Server

Backup is the activity of copying files or database so that they will be preserved in case of equipment failure or other catastrophic situations.


Normal backup
A copy backup copies all the files you select, but does not mark each file as having been backed up (in other words, the archive attribute is not cleared). Copying is useful if you want to back up files between normal and incremental backups
because copying does not affect these other backup operations.


Procedure to backing up the data through Normal backup:


1. Start -> Run - > type ntbackup.exe Press enter. [ It will look like this]


Now you need to click on the Add Job. You will get the following wizard. Click on Next

Select the appropriate option as per your requirement.

Select the files and folders as per your requirement for backing up the data. Click on next

After that locate the backup location where you want to take the backup & type the name of backup & Click on next

Select the Normal Backup from Drop Down List. And Click on next.

You will get the following wizard if you want to verify the data then you can choose this option. And click on next

Enter the job name and click on next.

You will get the finish wizard

Incremental backup :
An incremental backup backs up only those files that have been created or changed since the last normal or incremental backup. It marks files as having been backed up (in other words, the archive attribute is cleared). If you use a combination of normal and incremental backups, you will need to have the last normal backup set as well as all incremental backup sets to restore your data.

Differential backup
A differential backup copies files that have been created or changed since the last normal or incremental backup. It does not mark files as having been backed up (in other words, the archive attribute is not cleared). If you are performing a combination of normal and differential backups, restoring files and folders requires that you have the last normal as well as the last differential backup.

Authoritative Backup or System State Backup
System state backup creates a backup file for critical system related components. This backup file can be used to recover the critical system components after a crash.

Which components are backed up by the System State backup?

The Registry, boot files, as well as important system files. Then depending on their availability, the following services will be backed up as well:
Active Directory directory service, Certificate Service database, COM+ Class Registration database, SYSVOL directory.

Authoritative Restoration:


1. Restart the domain controller.
2. When the Windows 2000 Startup menu is displayed, select Directory Services Restore Mode, and then press ENTER.
3. Restore the data from backup media for an authoritative restore. To do this, follow these steps:

a. In Directory Services Restore mode, click Start, point to Programs, point to Accessories, point to System Tools, and then click Backup to start the Windows 2000 Server Backup utility.
b. Click Restore Wizard, and then click Next.
c. Select the appropriate backup location, and then make sure that at least the System disk and System State containers are
selected.
d. Click Advanced, and then make sure that you restore junction points. If you do not use the Advanced menu, the restore
process will not be successful.
e. In the Restore Files to list, click Original Location.
f. Click OK, and then complete the restore process. A visual progress indicator is displayed.
g. When you are prompted to restart the computer, do not restart.

4. At a command prompt, type ntdsutil, and then press ENTER.
5. Type authoritative restore, and then press ENTER.
6. Type the following command, and then press ENTER:
restore subtree ou=OU_Name,dc=Domain_Name,dc=xxx
7. Type quit, press ENTER, type quit, and then press ENTER.
8. Type exit, and then press ENTER.
9. Restart the domain controller.

Global Address List in Exchange Server 2003

It's natural that users try and locate each others email addresses in the GAL. But why would an administrator need to configure Exchange 2003's GAL? The most likely answers are:
1) To check permissions.
2) Create custom lists.
3) Control how the names are displayed in the Global Address List.
Just go with the default GAL (Global Address List). Exchange 2003 server automatically adds every new mail recipient to the Global Address List
Objects found in the Exchange 2003 GAL

Pay careful attention to the difference between a mailbox enabled user and a mail-enabled user; a security group and a distribution group. Mailbox enabled accounts. Regular users with MAPI mailboxes Active Directory accounts.

Mail-enabled users. Contractors who have an Active Directory logon but no mailbox. (No mailbox in your Exchange Organization.) Contacts. Suppliers, customers, people with email address outside your organization. No Active Directory account.

Distribution groups. These can be Global or Universal Groups, but they are designed for email rather than security. These are sometimes referred to as DLs - Distribution lists instead of distribution groups.

Security groups that have mailboxes. People will say that unless you have a good reason, favour the classic Distribution group and avoid Mail Enabled Security Groups.

Public Folders. Mail-enabled public folders if your users need an easy way to post.

Groups In Active Directory

Groups are containers that contain user and computer objects within them as members.
FEATURES OF GROUPS
---When security permissions are set for a group in the Access Control List on a resource, all members of that group receive those permissions.
---Domain Groups enable centralized administration in a domain.
---All domain groups are created on a domain controller.

In a domain, Active Directory supports different types of groups and group scopes:--

---The group type determines the type of task that you manage with the group.
---The group scope determines whether the group can have members from multiple domains or a single domain.
The two types of groups are

---Security groups are security principals; this means that you can grant permissions and rights to this group.
In addition, the security group can be mail-enabled so that users can send mail messages to the group membership. Security groups allow you to use one type of group for not only assigning rights and permissions, but also as a distribution list for e-mail.

---Distribution groups are used merely to organize user accounts together for the purpose of sending them messages; they cannot be used for assigning permissions

Group Scope
Any group, whether it is a security group or a distribution group, is characterized by a scope that identifies the extent to which the group is applied in the domain tree or forest

Universal
• Accounts from any domain within the forest in which this Universal Group resides
• Global groups from any domain within the forest in which this Universal Group resides
• Universal groups from any domain within the forest in which this Universal Group resides

Global
• Accounts from the same domain as the parent global group
• Global groups from the same domain as the parent global group

Domain local
• Accounts from any domain
• Global groups from any domain
• Universal groups from any domain
• Domain local groups but only from the same domain as the parent domain local group

Clustering

In a computer system, a cluster is a group of servers and other resources that act like a single system and enable high availability and, in some cases, load balancing and parallel processing.
Uses:
Cluster computing can be used for load balancing as well as for high avilability. A common use of cluster computing is to load balance traffic, on high-traffic Web site. Windows Server clusters provide failover support for back-end applications and services that require high availability and data integrity. These back-end applications include enterprise applications such as database, file server, enterprise resource planning (ERP), and messaging systems.

Features:
First designed for the Microsoft Windows NT® Server 4.0 operating system, server clusters are substantially enhanced in the Microsoft Windows Server 2003, Enterprise Edition, and Windows Server 2003, Datacenter Edition, operating systems. With server clusters you can connect multiple servers together in order to provide high availability and easy manageability of data and programs running within the cluster. Server clusters provide the following three principal advantages in clustering technology
  • Improved availability by enabling services and applications in the server cluster to continue providing service during hardware or software component failure or during planned maintenance.
    Increased scalability by supporting servers that can be expanded with the addition of multiple processors (up to a maximum of eight processors in Windows Server 2003, Enterprise Edition, and 32 processors in Windows Server 2003, Datacenter Edition), and additional memory (up to a maximum of 8 gigabytes [GB] of random access memory [RAM] in Enterprise Edition and 64 GB in Windows Server 2003 Datacenter Edition).·
  • Improved manageability by enabling administrators to manage devices and resources within the entire cluster as if they were managing a single computer


The cluster service is one of two complementary Windows clustering technologies provided as extensions to the base Windows Server 2003 and Windows 2000 operating systems. The other clustering technology, Network Load Balancing (NLB), complements server clusters by supporting highly available and scalable clusters for front-end applications and services such as Internet or intranet sites, Web–based applications, media streaming, and Microsoft Terminal Services.

There is an important to be noted that Sharepoint and Exchange doesnot support Clustering

Diffrence between NTFS and FAT file system

Lets see what is the difftrence between NTFS and FAT file system.

WHAT IS FILE SYSTEM ?
In computing, a file system (often also written as filesystem) is a method for storing and organizing computer files and the data they contain to make it easy to find and access them. File systems may use a data storage device such as a hard disk or CD-ROM and involve maintaining the physical location of the files, they might provide access to data on a file server by acting as clients for a network protocol (e.g., NFS, SMB, or 9P clients), or they may be virtual and exist only as an access method for virtual data (e.g., procfs).

FAT 32
Windows 95 OSR2, Windows 98, and Windows Me include an updated version of the FAT file system. This updated version is called FAT32. The FAT32 file system allows for a default cluster size as small as 4 KB, and includes support for EIDE hard disk sizes larger than 2 gigabytes (GB).

ADVANTAGES OF FAT
• FAT32 supports drives up to 2 terabytes in size. NOTE: Microsoft Windows 2000 only supports FAT32 partitions up to a size of 32 GB.
• FAT32 uses space more efficiently. FAT32 uses smaller clusters (that is, 4-KB clusters for drives up to 8 GB in size), resulting in 10 to 15 percent more efficient use of disk space relative to large FAT or FAT16 drives.
• FAT32 is more robust. FAT32 can relocate the root folder and use the backup copy of the file allocation table instead of the default copy. In addition, the boot record on FAT32 drives is expanded to include a backup copy of critical data structures. Therefore, FAT32 drives are less susceptible to a single point of failure than existing FAT16 drives.
• FAT32 is more flexible. The root folder on a FAT32 drive is an ordinary cluster chain, so it can be located anywhere on the drive. The previous limitations on the number of root folder entries no longer exist. In addition, file allocation table mirroring can be disabled, allowing a copy of the file allocation table other than the first one to be active. These features allow for dynamic resizing of FAT32 partitions. Note, however, that although the FAT32 design allows for this capability, it will not be implemented by Microsoft in the initial release.

DISADVANTAGES OF FAT
Preferably, when using drives or partitions of over 200 MB the FAT file system should not be used. This is because as the size of the volume increases, performance with FAT will quickly decrease. It is not possible to set permissions on files that are FAT partitions. FAT partitions are limited in size to a maximum of 4 Gigabytes (GB) under Windows NT and 2 GB in MS-DOS. For additional information on this limitation, please see the following article in the Microsoft Knowledge Base:
ARTICLE-ID: 118335 (http://support.microsoft.com/kb/118335/EN-US/)

TITLE: Maximum Partition Size in MS-DOS

===================================================================

NTFS
NTFS is a high-performance and self-healing file system proprietary to Windows XP 2000 NT, which supports file-level security, compression and auditing. It also supports large volumes and powerful storage solution such as RAID. The most important new feature of NTFS is the ability to encrypt files and folders to protect your sensitive data
From a user's point of view, NTFS continues to organize files into directories, which, like HPFS, are sorted. However, unlike FAT or HPFS, there are no "special" objects on the disk and there is no dependence on the underlying hardware, such as 512 byte sectors. In addition, there are no special locations on the disk, such as FAT tables or HPFS Super Blocks.

The goals of NTFS are to provide:
• Reliability, which is especially desirable for high end systems and file servers
• A platform for added functionality
• Support POSIX requirements
• Removal of the limitations of the FAT and HPFS file systems
Reliability:
To ensure reliability of NTFS, three major areas were addressed: recoverability, removal of fatal single sector failures, and hot fixing. NTFS is a recoverable file system because it keeps track of transactions against the file system. When a CHKDSK is performed on FAT or HPFS, the consistency of pointers within the directory, allocation, and file tables is being checked. Under NTFS, a log of transactions against these components is maintained so that CHKDSK need only roll back transactions to the last commit point in order to recover consistency within the file system. Under FAT or HPFS, if a sector that is the location of one of the file system's special objects fails, then a single sector failure will occur.

NTFS avoids this in two ways: first, by not using special objects on the disk and tracking and protecting all objects that are on the disk. Secondly, under NTFS, multiple copies (the number depends on the volume size) of the Master File Table are kept.

ADVANTAGES OF NTFS

NTFS is best for use on volumes of about 400 MB or more. This is because performance does not degrade under NTFS, as it does under FAT, with larger volume sizes. Disk quotas, file compression, file and folder level securities and more are other advantages.
Alternate data streams (ADS)
Sparse files
Reparse points
Volume mount points
Directory Junctions
Hierarchical Storage Management (HSM)
Native Structured Storage (NSS)
Volume Shadow Copy
File compression
Encrypting File System (EFS)
Symbolic links
Transactional NTFS

DISADVANTAGES OF NTFS:

It is not recommended to use NTFS on a volume that is smaller than approximately 400 MB, because of the amount of space overhead involved in NTFS. This space overhead is in the form of NTFS system files that typically use at least 4 MB of drive space on a 100 MB partition. Currently, there is no file encryption built into NTFS. Therefore, someone can boot under MS-DOS, or another operating system, and use a low-level disk editing utility to view data stored on an NTFS volume. It is not possible to format a floppy disk with the NTFS file system; Windows NT formats all floppy disks with the FAT file system because the overhead involved in NTFS will not fit onto a floppy disk.

DIFFERENCES
NTFS
1) allows access local to w2k,w2k3,XP,win NT4 with SP4 & later may get access for somefile.
2) Maximum size of partition is 2 Terabytes & more.
3) Maximum File size is upto 16TB.4) File & folder Encryption is possible only in NTFS.

FAT 32
1) Fat 32 Allows access to win 95,98,win millenium,win2k,xp on local partition.
2) Maximum size of partition is up to 2 TB.
3) Maximum File size is up to 4 GB.
4) File & folder Encryption is not possible.

REFERENCE LINKS:
http://www.ntfs.com/
http://www.digit-life.com/articles/ntfs/
http://vlaurie.com/computers2/Articles/filesystems.htm


Friday, May 9, 2008

Internet Information Services (details)

Internet Information Services known as IIS. IIS provides a redesigned World Wide Web Publishing Service (WWW service) architecture that can help you achieve better performance, reliability, scalability, and security for your Web sites, whether they run on a single server running IIS or on multiple servers.

Versions of IIS
IIS 1.0 WIN NT 3.5.1 as a free edition
IIS 2.0 WIN NT 4.0
IIS 3.0 WIN NT 4.0 sp3
IIS 4.0 WIN NT 4.0 option pack
IIS 5.0 WIN 2000
IIS 5.1 WIN xp prof
IIS 6.0 WIN 2k3, xp Prof X64 edition
IIS 7.0 WIN vista, WIN n 2k8

IIS 6.0 runs a server in one of two distinct request processing models, called application isolation modes. Application isolation is the separation of applications by process boundaries that prevents one application or Web site from affecting another and reduces the time that you spend restarting services to correct problems related to applications.
In IIS 6.0, application isolation is configured differently for each of the two IIS application isolation modes. Both modes rely on the HTTP protocol stack (also referred to as HTTP.sys) to receive Hypertext Transfer Protocol (HTTP) requests from the Internet and return responses. HTTP.sys resides in kernel mode, where operating system code, such as device drivers, runs. HTTP.sys listens for, and queues, HTTP requests.
New request-processing architecture and application isolation environment enables individual Web applications, which always run in user mode, to function within a self-contained worker process. A worker process is user-mode code whose role is to process requests, such as returning a static page or invoking an Internet Server API (ISAPI) extension or filter. Worker processes use HTTP.sys to receive requests and send responses over HTTP

Installation of IIS (IIS 6.0)
There are 3 methods for installing IIS:

· Using the Configure Your Server Wizard
· Using Add or Remove Programs from Control Panel
· Using unattended setup.


To install IIS using the Configure Your Server Wizard
From the Start menu, click Manage Your Server
Under Managing Your Server Roles, click Add or remove a role
Read the preliminary steps in the Configure Your Server Wizard and click Next
Under Server Role, click Application server (IIS, ASP.NET) and then click Next
If you want to serve either of the optional technologies (FrontPage Server Extensions or ASP.NET), on the Application Server Options page, select the appropriate check boxes, and then click Next.
Read the summary and click Next.
Complete the wizard, and then click Finish

To install IIS using Control Panel

1. From the Start menu, click Control Panel
2. Double-click Add or Remove Programs.
3. Click Add/Remove Windows Components
4. In the Components list box, click Application Server
5. Click Details
6. Click Internet Information Services Manager
7. Click Details to view the list of IIS optional components.
8. Select all optional components you wish to install

Core components of IIS

· IIS admin à manages the IIS matabase (it stores the IIS configuration data in a plain text xml file that can read or edited.
· WWW à hosting internet and intranet content
· FTP à hosting sites from which users can upload and download files
· NNTP à hosting new groups or discussion groups
· SMTP à sending and receiving email messages

Protocols used by the services, which are the components of IIS

HTTP : Hyper text transfer -80
SMTP : Simple mail transfer protocol -- 25
NNTP : Network news transfer protocol -119
FTP : File transfer protocol - 21


WMSDE and SSEE

Lets talk about the free versions of SQL those are WMSDE that is SQL Desktop Engine and SSEE SQL server express edition, now when you talk about Sharepoint
Sharepoint version 2003 that is Windows Sharepoint Services or WSS 3.0 come with WMSDE if you choose to install in Basic Mode and Microsoft Office Sharepoint Server 2007 or MOSS gets SSEE installed incase you choose the Basic install that is with SQL Database Server
Now as we know both are the free versions of SQL but there is a diffrence between them.
Lets Focus on WMSDE for the Moment
  • MSDE is based on SQL 2000 technology WHILE SQL Server Express is based on SQL Server 2005 technology.
  • MSDE 2000:--Operating Systems:--MSDE 2000 is designed to run on the following operating systems:--
  • Microsoft Windows 98
  • Microsoft Windows Millennium Edition
  • Microsoft Windows NT Workstation 4.0 with Service Pack 5 (SP5), or later
  • Microsoft Windows NT Server 4.0 with Service Pack 5 (SP5), or later
  • Microsoft Windows NT version 4.0 Server Enterprise Edition with Service Pack 5 (SP5), or later
  • Microsoft Windows 2000 Professional
  • Microsoft Windows 2000 Server
  • Microsoft Windows 2000 Advanced Server
  • Microsoft Windows 2000 Datacenter Server
  • Microsoft Windows XP
  • Microsoft Windows Server 2003

How to Obtain MSDE 2000:--

Additionally, you can obtain Microsoft SQL Server 2000 Desktop Engine (MSDE 2000) Release A from Microsoft Download Center. To download Microsoft SQL Server 2000 Desktop Engine (MSDE 2000) Release A, visit the following Microsoft Web site: http://www.microsoft.com/downloads/details.aspx?FamilyId=413744D1-A0BC-479F-BAFA-E4B278EB9147

What are the limitations of MSDE?

1--An MSDE database can be no larger than 2 GB (this includes MDF and NDF files only — log sizes are not included in the size limit)

2--MSDE does not ship with GUI administrative tools such as Enterprise Manager or Query Analyzer.You can take the SQL Server install CD, run it on the client(s), and choose "Install client tools only" during setup. This will install Query Analyzer, Enterprise Manager, and other useful tools.

3--MSDE does not offer OLAP / data warehousing capabilities.

Features of SSEE:

Supported Operating Systems:

  • Windows 2000 Service Pack 4
  • Windows Server 2003 Service Pack 1
  • Windows XP Service Pack 2

Features:-- --

  1. 4 GB per database (not including log files);
  2. Common language runtime (CLR) integration, -
  3. New data types such as VARCHAR(MAX) and XML, user-defined types, and user-defined aggregates are supported.
  4. SQL Server Express databases can attach to SQL Server 2005, and applications programmed with a SQL Server Express instance will work equally well with a SQL Server 2005 instance.

Limitations:----

  • data mirroring and clustering are not available;
  • full-text search is not available;
  • SQL Agent is not available (you can use Service Broker or Task Scheduler instead);
  • Reporting Services is not available;
  • Business Intelligence is not available (this includes Notification Services and Analysis Services).

The link to download Express Edition of SQL is

http://www.microsoft.com/downloads/details.aspx?familyid=220549b5-0b07-4448-8848-dcc397514b41&displaylang=en

As we Start .........................

I work as a Support Enginner at Microsoft and I support the world-wide known ans appreciated product Sharepoint I have just started taking classes for Sharepoint . And I am amazed with the learning that I share everyday with my class. I love Sharepoint although its a bit complex to most of the people so as it is very user friendly and flexiable to develop applications. Back to where I was, I have found some very good intresting facts and details about the product which will be very useful to my friends who work in same designation as me and can derive a whole lotta solutions, Also I am going to post stuff about information not only on sharepoint but IIS and SQL and other supporting tools in genral. These information is every thing that we find in Google or Live, It just had been placed together. The posts donot contain any Internal and Restricted stuff from Microsoft as I respect my Employer and will not do anything to put my job at stack.

Here on I will post my coments and worldwide known resolutions that we have for all the issues or Infomation which is good to know, I hope you like this blog if you want me to add or remove any stuff or introduce features please leave me comments so that this becomes more fun as we move along.